This guide explains one of the more popular security features found in IP cameras and that is how to have your camera send you an email when it detects motion. I know it's a question we get asked a lot and it's very simple so follow this guide for the complete low-down.
This guide is suitable for all Axis cameras except the Axis 206. The Axis 207/W/MW will also look slightly different as it has a basic interface for configuring events. The theory should remain the same but should be a little simpler when setting up.
We will assume that your Axis camera is configured and you can view a live image on your local network before we begin. We are going to use an Axis 211 for the purpose of this guide. Your camera's interface may look a little different based on the model or firmware type, but the functionality and choices should be similar.
Getting your Axis camera to send an email when motion is detected
We can break down this process into three main areas:
- Adding the SMTP server details (selecting which email server to use)
- Setting up the alarm trigger (that's how we trigger the event, in this case through motion detection)
- Finalising the event (what to do once the trigger has been activated)
Step 1 - Selecting your SMTP server
Log into your camera and enter the setup pages by clicking the 'Setup' button at the top right-hand side of the screen. You will be presented with the setup pages. To set the SMTP server first click on the 'System Options' tab on the left-hand side of the screen. Doing this will open further menu options below:
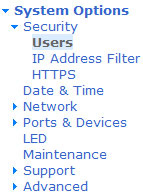
In the new expanded menu click 'Network' and the menu will expand again:
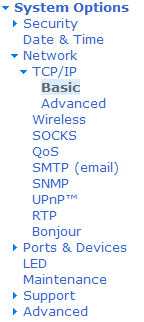
Click the 'SMTP (email)' option to open the SMTP server settings. You should see a screen similar to this:
Axis 211 - SMTP (email) settings page (firmware version: 4.30)
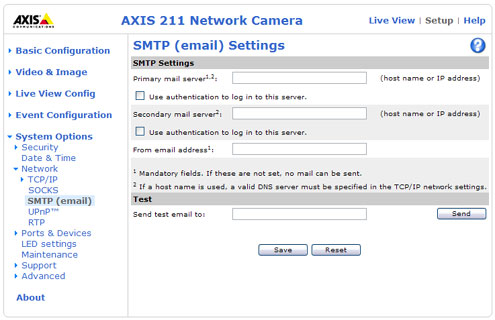
Enter the details as follows:
- Primary/Secondary mail server: Enter the host names or IP addresses for your primary and secondary mail servers in the fields provided. Note that to use hostnames for mail servers, a DNS server must be specified in the 'Network > TCP/IP > Advanced' setup pages.
- Primary/Secondary server ports: Enter SMTP server port numbers for the primary and secondary SMTP servers. The default value is 25 for SMTP and this should only be changed if you know your SMTP server requires a different port.
- From email address: Indicates the email address which will appear on the sent messages and will also form the reply address.
- Testing: There is an option to send a test email to a specified address. Use this feature to confirm if your SMTP settings are correct before moving to step 2.
Step 2 - Setting the alarm trigger
Next we want to set how the camera will trigger the event. There are many ways to achieve this such as motion detection, audio detection, external sensor input such as a doorbell or window sensor or the event can be manually triggered using an on-screen button which appears on the live view page. For this guide, we will focus on motion detection as this is the most popular method of triggering alarms.
To set the triggering method select the 'Event Configuration' menu option from the setup. From the menu on the left select 'Event Types' to set a motion event. You will see a page similar to the following:
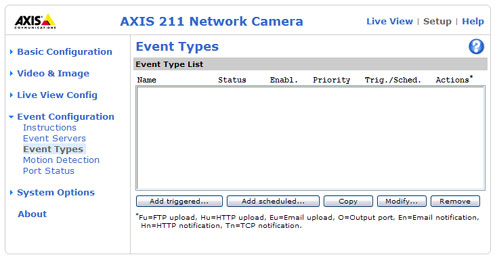
This page is where you add, manage and monitor all the events you have set in the camera. At the moment because no events are set the events list is blank. We will soon remedy that by adding our event.
To add your motion event click the 'Add triggered...' button. This will allow us to add a triggered event. You will see a page similar to the one below open in a pop-up window:
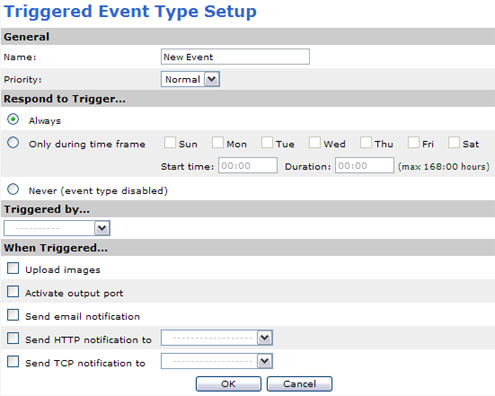
Under the 'General' heading, input the following:
Name: Input a name for the event using no more than 20 characters. The name is not important but it is advisable to use something which reminds you what the event is for as this name will appear in the 'Event Type' list.
Priority: This determines the event type's priority as a 'job' in the operating system. A low-priority job is not considered as important as a job with normal priority, and will thus take longer to complete. A high-priority job is considered more important than most of the services running in the AXIS 211, including the web server.
Under the 'Respond to Trigger' heading:
You can have your event respond to your trigger all the time ('Always') or set it up only to respond based on a schedule or have it never respond (event disabled). For the purposes of this guide, we will leave the trigger set to 'Always'.
Under the 'Triggered by...' heading:
From the drop-down box select 'Motion detection' as the triggering method and a further drop-down box will appear allowing you to select which motion detection window you wish to use.
(Note: Axis cameras offer multi-window motion detection allowing you to configure multiple detection zones in any given scene. To be able to use motion detection as an event trigger you must have at least one detection zone set up in the camera using the Motion detection menu option under the 'Event configuration' heading.)
Under the 'When triggered' heading:
For this guide we want to have the camera send an email when it triggers an event so check the box marked 'Upload images' and select the method of upload to 'Email'. You will then see a list of options similar to those below:
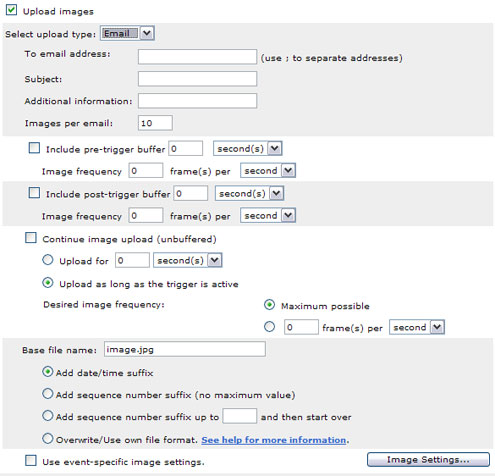
Enter the following to configure the email account in the server:
- To email address: Enter the recipient's email address. Use semicolons to separate multiple addresses. Subject: Enter the subject line of the email.
- Additional information: This is the body of the email message and can be used to e.g. add extra information. A maximum of 255 characters can be used in this field.
- Images per email: Set the number of images you wish to include in each email message.
- Include pre-trigger buffer: A pre-trigger buffer contains images from the time immediately preceding the trigger. These are stored internally in the server. This buffer can be very useful when checking to see what happened to cause the trigger. Check the box to enable the pre-trigger buffer, enter the desired total length in seconds, minutes or hours, and specify the required image frequency.
- Include post-trigger buffer: This function is the counterpart to the pre-trigger buffer described above and contains images from the time immediately after the trigger. Configure as for pre-trigger.
- Continue image upload (unbuffered): Check this box to enable the upload of images for a fixed length of time. Specify the total length of the uploaded recording, in seconds, minutes or hours, or for as long as the trigger is active. Finally, set the desired image frequency to the maximum (the maximum available) or to a specified frequency. Note that the frame rate will be the best possible, but might be lower than expected, especially if uploading via a slow connection.
- Base file name: This name will be used for all of the image files saved. If suffixes are also used, the file name will take the form ..
- Add suffix: Add either a date/time suffix or, a sequence number - with or without a maximum value
- Overwrite/Use own file format: This option will save one file only and constantly overwrite it. Alternatively, it is also possible to perform advanced file name formatting, by including special patterns in the file name.
- Use event-specific image settings: By default, the event type will use the settings from the Video & Image Configuration. However, clicking the Image Settings button allows certain settings for the event type to be individually configured. Other event types will not be affected by these changes.
Finish
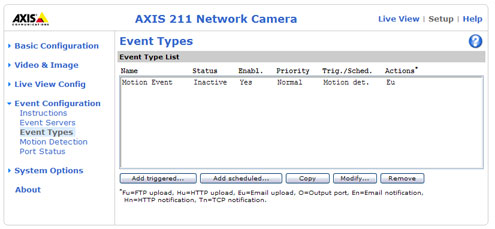
Click 'Ok' to save the event and your new event will be listed on the 'Event Type List' table as shown below:
Walk around in front of your camera and test to see if your emails start to come in and adjust the motion sensitivity to your requirements.


