


Adding a camera into your Milestone XProtect video management system may seem like the simplest of things, but it is a question we get asked a lot for the simple reason that it is not as easy as it may seem.
Adding a device via the Milestone XProtect Management Client can seem complex and time consuming for a user who has never performed it before. This how-to guide will demonstrate how to add a device into Milestone and what requirements need to be met to complete the task.Let's begin
Once the software has been installed, launch the Management Client. This will be installed on the main server that holds all other Milestone components and allow you to make administrative changes unless you have performed a distributed installation where the Management Client will exist on the server with the Management Server. However, you can install the Management Client on any PC with access to the Management Server to administer the system from anywhere.
1. Check device licensing
The first step is to ensure that you have an available device license to use for the new device. This is separate from your base license (SLC), which is used to license the XProtect software installation. Each device used in the system needs to have a corresponding license.

If the device hasn't been licensed it will be active but in a 30-day grace period until you add additional licenses, or successfully activate the licenses via the online or offline activation methods.
Once you know that you have available licenses, you can proceed to add your new camera into Milestone.

2. Select the recording server
Once successfully logged in you should see a menu bar on the left-hand side of the screen detailing all configuration aspects for managing your server configurations. Find the 'Servers' tree and select the server you wish to add the camera onto. Most installations have only a single recording server, but you will see the servers that are available listed when opening the 'Recording Servers' entity. If you do have more than one recording server, choose the correct one to add the camera to.
3. Adding new hardware
You can now right-click on the selected server and choose 'Add hardware' or press CTRL + N to launch the 'Add hardware' wizard.

You will first be asked to select your hardware detection method. You have 3 options which are: Express, Address Range Scanning, and Manual.
- Express: Milestone will scan your network and display devices that have been found on the network that can be added into the system
- Address Range Scanning: allows you to set an IP range for Milestone to scan, e.g. 192.168.0.90 -> 192.168.0.100. This can be particularly useful for adding in a group of devices
- Manual: allows you to enter the specific IP address of the device and manually add one or more devices.
For the purpose of this tutorial, let's add a device using the manual hardware detection option, which is our preferred method as it affords you full control of the process.

Pro tip: it can be tempting to add all your devices at once, and this can sometimes be the most effective way for you, but adding devices manually one-by-one ensures you follow each step completely and leads to a more neatly designed system as you can determine the hardware and device names, default camera groups, etc yourself, rather than have Milestone apply its own defaults. However, you can rename devices and hardware later on.
Now select the radio button for Manual and hit next. You will then be asked to present the username and password for the hardware device. If running hardware detection with multiple devices, you may add multiple usernames and passwords in here to match. Ensure that the correct username and password have been entered and ensure the checkbox next to the password has been ticked so that it is used.

4. Selecting the device driver
Next, you will be asked which driver to use. This will allow you to select the make of the camera. It will considerably speed up the process of scanning by not having the system scanning for camera drivers we know we don't need, as we know our camera make and model. As shown below, we are using only Axis drivers as our camera is an Axis device.

So, first, select 'Clear all' then select the correct make of camera. You can also select the ONVIF driver if the make of the device you are adding is not directly supported.
You can find out if your device is supported here.
If it isn't a supported device but is ONVIF compliant, you may still be able to add the device using the 'ONVIF' driver.
5. Enter your camera's IP address
Next, you will have to enter the address of the device and its port number. The default port for a hardware device is 80 unless it has been changed on the device. You can also manually select the specific hardware model of the device, but typically leave as 'auto-detect' to allow Milestone to detect and apply the correct supported hardware model itself.

Now hit next, which will take you to the next screen and the progress bar detailing the scanning process. If all details were entered correctly, the green bar will reach the end and you will see a green tick with 'success.' If you get a red cross with 'failure' next to it, you must go back and check that all set parameters are correct; this could be username and password, IP address or port number. In the case of failure, click on the word 'failed' and you will see more details as to why the device addition did not succeed.

6. What is 'additional hardware'?
Clicking next again brings you to adding additional hardware supported with the camera device. This is an important step as Milestone will give you access to all the capabilities its driver affords unless you select otherwise. For example, some cameras can deliver multiple live views (8 or more in some cases) and you may not want them all to be displayed in the system as this increases your storage and recording overheads. Similarly, you have the option to include all camera virtual or hardware inputs and outputs, microphones, speakers, and metadata channels. Select the ones you will need and uncheck the rest.

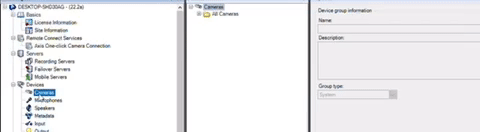
7. Choose a camera group
It is always best practice to categorise your cameras using the camera group function and you need to create at least one group when adding a camera and place the camera into it. This is most useful in larger installs to logically group cameras and other devices but can also be useful with smaller camera counts. Here you can select the appropriate group you want the camera in and can also adjust this from the ‘Devices’ and then ‘Cameras’ node.
Pro tip: Create an 'All cameras' device group and add all new devices into it. You can then run configuration changes across all devices at the same time by making the change against a group of devices. You might also create groups like 'External cameras', 'Office cameras', 'night vision cameras', '1080p cameras' etc to build up a system that's easier to manage and maintain. Finally, you can also run flexible rules against a device group, which all helps to make using the system easier.
You have the option here to set your device naming conventions as well.

8. Adding the device and re-naming
Clicking finish will add the device to the recording server. You may rename the hardware to whatever you see fit and can click the plus arrow to display what hardware has been added.
Pro tip: Well-maintained Milestone systems use a consistent naming convention and camera numbering alongside logical device groupings. We recommend a naming convention like “CAM01 – Office car park” for readability, easy identification and to ensure cameras are listed alphanumerically. You can also name the hardware accordingly, perhaps by IP address or asset code.
Your camera should now also be listed under the ‘cameras’ tab in the devices section. Clicking on the device you just added will allow you to rename the device to something more appropriate and change device settings such as video format, resolution, and frame rate. You will then go on to set up your detection method for recording and any associated features appropriate for your use case, such as events and alarms.
With this as a guide, you now should have enough knowledge to confidently add your cameras into Milestone XProtect and set them up according to best practice.
---
Our Support Desk team has extensive experience and knowledge with Milestone XProtect, and we have cost-effective support plans and service level agreements for systems of all sizes. Contact us for more details.