Whenever a router is connected to the Internet it receives what is known as a public IP address. This is your identifier on the internet and is unique all over the world. However, internet service providers (ISPs) only have a set number of IP addresses that they can give to their customers. Because of this most ISPs will rotate their customers' IP address each time they connect or reconnect to the internet, or as sometimes is the case, whenever they feel like it!
This can be a problem whenever you set up a camera using a domestic-level broadband account. A fitting analogy would be to consider your home telephone number changing whenever BT felt like it. How would you be able to call home if you didn’t know your number?
There are however ways to combat this. You can often liaise with your ISP to secure yourself a static IP address, meaning your public IP address will never change, but you will often pay extra for this service.
The other alternative is to set up a dynamic DNS account. For this to operate a piece of software has to be set up on your router, camera or a local PC. This software periodically sends an update to the Dynamic DNS service to renew your IP address, keeping it current. It also has the added benefit of giving a meaningful name to your camera instead of an IP address making it easier to remember and will keep your camera connected to the Internet at all times, even if you change your ISP!
Many camera/router manufacturers support this feature in their devices. This article will look at how this is configured in a Panasonic camera using their free Dynamic DNS service: Viewnetcam.com.
This guide is suitable for the following Panasonic IP cameras:
- BL-C1
- BL-C20
- BL-C10
- BL-C30
- BL-C111
- BL-C131
- BB-HCM311
- BB-HCM331
- BB-HCM511
- BB-HCM515
- BB-HCM531
- BB-HCM381
- BB-HCE481
- BB-HCM580
- BB-HCM581
Viewnetcam.com
Viewnetcam.com is an online service provided free by Panasonic which will automatically update your public IP address when your ISP changes it. The way it works is simple. The system is built into your Panasonic IP camera and when activated, your camera will make periodic connections to the Viewnetcam service supplying its current IP address.
We are basing this guide on the Panasonic BL-C10 camera. Other models have slightly different options and terminology but are essentially the same.
Step 1
We will already assume your camera is configured and you can access it on your local network and externally from another location over the Internet.
Step 2
Log into your camera as an administrator and enter the setup pages by clicking on the ‘setup’ tab.
Step 3
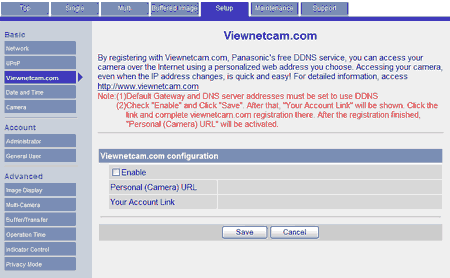
In the menu down the left-hand side, you will see a link which will either say ‘Viewnetcam.com’ or ‘Dynamic DNS’ depending on your model of camera. In our example, this link says ‘Viewnetcam.com’. Click this link to configure the dynamic DNS settings.
Step 4
The page shown will be the page where you activate the Viewnetcam service in the camera.
Note: In some Panasonic models you are given the choice of using the Viewnetcam service or using a third-party Dynamic DNS service such as DynDNS.com. We would suggest using the Viewnetcam service unless you experience difficulty with it.

Click the checkbox marked ‘Enable’ and click the ‘Save’ button to activate the Viewnetcam service.
You should get a message saying “Success!” and a button which will link you back to the previous page titled ‘Go to Viewnetcam.com page’. Click this button to return to the previous page.
Step 5
Now that your camera is activated you need to register with the online service. You do this by clicking on the link titled “Your Account Link” which is a specific link to take you directly to the Viewnetcam.com website.
Click the ‘new registration’ link.
You will need to enter your current email address, set a password and enter some personal information. Once this is done click “I agree”. You will then be asked to choose a name for your DNS address. Enter what you wish into the textbox. Remember that there can be no spaces and must contain only letters or numbers. Once this is entered click “choose”.
Step 6
And that’s all there is to it!
Use your new Viewnetcam address to access your IP camera from anywhere across the Internet.


