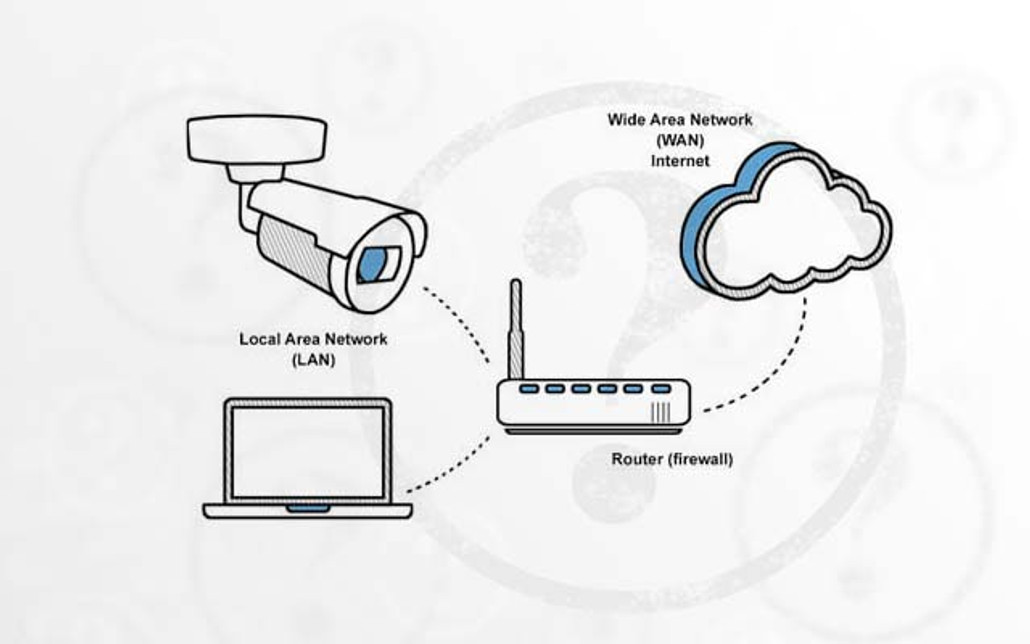
Note: this post refers to products no longer available or supported and exists here for information purposes only due to its popularity. If you own this router and are still using it we strongly advise that you replace it for cybersecurity reasons. NW no longer recommends the use of port forwarding or the exposing of cameras to the internet via public IP address, except in specific circumstances where other mitigation measures are in place.
Setting up remote access to your IP Camera from anywhere on the Internet is one of the many benefits of IP Cameras, but sometimes this doesn't go smoothly when you have to start fiddling with routing, firewalls and port numbers.
Luckily, we are on hand to provide information about how this is done on the majority of common routers we use today. Let's start by looking at the Netgear DG834.
(This should also work on most models of Netgear router as their firmware is very similar across the range)
We have assumed the following:
- Camera's IP address is static.
- Camera is on default IP address of: 192.168.0.90
- Subnet mask is standard class C: 255.255.255.0
- Default Gateway is default for a Netgear router: 192.168.0.1
- Camera has been placed on port 4440.
Step 1
Login to your router using the address 192.168.0.1. If you haven't changed your login details (and you definitely should) the default username is 'admin' and default password is 'password'.
Step 2
On the menu down the left click the link that says 'services' you should be presented with the following options:

Step 3
Click the button to 'Add Custom Service' and you should be presented with a screen like:
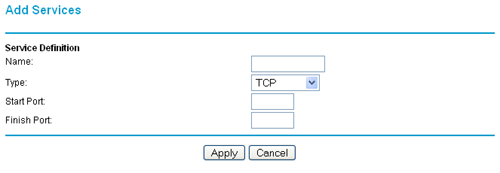
Name: It doesn't matter what you put here, it's just helpful to put something memorable so that you can associate the rule with your IP camera in a moment.
Type: Select 'TCP' in the drop-down box.
Start Port: Enter the port number of your camera, in this case 4440.
Finish Port: Enter the port number of your camera again, 4440.
Click 'apply' to add the service. This should return you to the previous page and show your newly added service as shown below:

Step 4
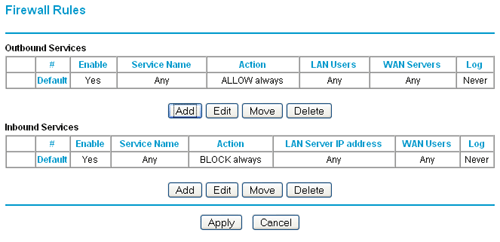
Now we have to add a rule to the firewall using the newly created service. To do this click 'Firewall Rules' in the menu on the left. You will see a screen like this:
Step 5
Click the 'add' button under the 'Inbound Services' table to add an inbound service. (this means that the rule applies to any traffic coming into the router from the internet).
Step 6
You will see a screen like the image below:
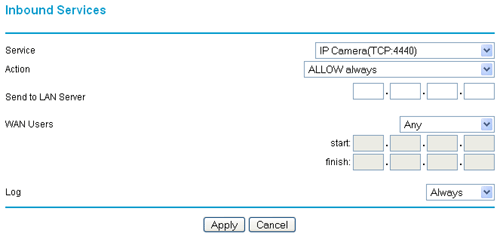
Service: As shown above use the drop-down menu to select the service your created in the previous step. As you can see we called ours 'IP Camera'.
Action: Select 'ALLOW always'.
Send to LAN Server: input the local IP address of your camera in here. In this example we would enter 192.168.0.90.
WAN Users: Select 'Any' to allow access to your camera from anywhere on the internet.
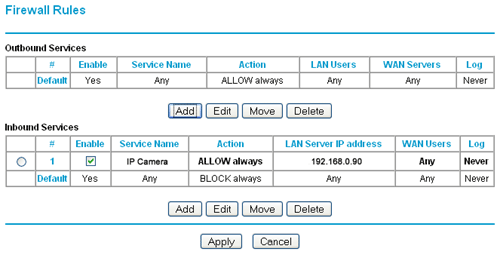
Log: You can choose to log actions created by this rule or not. Beware that if you choose to log these actions and your camera is publicly available you may find the log rapidly filling up. Click the 'Apply' button to save your rule. You will then be presented with an screen showing your firewall rule in place as below:
Step 7
That's all there is to it. You router should now be configured so you can access your camera externally. You should try it from the internet to see if it works! Netgear routers do NOT support NAT Loopback. Put simply, this means that you cannot test your EXTERNAL or WAN address from a LOCAL computer. You must be on an external network for your external connection to work.
If you have any questions please leave your comments below.


