


Note: this blog post exists for information only. The AxisCam.net service has been discontinued and no longer exists.
We've been asked about this many times so here is the complete guide to setting up your Axis IP camera or video server with its very own 'Axiscam.net' domain name.
First of all, what is 'Axiscam.net'? Well, it's all about accessing your camera from another location across the internet. The beauty of IP cameras is that you can connect to them from anywhere in the world, but in order to do so you must know the address to type into your browser. This is known as your 'Public IP Address'.
Public IP Address
This address is given to you by your Internet Service Provider (ISP). So if you have your broadband with BT then BT will allocate you a public IP address from their pool and this will become your personal public IP address, or internet address.
The downsides
Sounds easy enough, but there are two major downsides. Firstly, a public IP address is not something we can easily remember as it consists entirely of numbers. An example of a public IP address is 'http://216.239.59.104' which is actually the same as typing in 'http://www.google.co.uk' into your browser. I know which I find easier to remember...
Worst still is that a regular domestic broadband account will generally be on a 'dynamic' public IP address. This means that if you do manage to remember your IP address, chances are it will change the next time you try to use it!
The Solution
The solution is to use a Dynamic DNS service which is exactly what 'Axiscam.net' is. Dynamic DNS services allow you to register your public IP address. Once registered you can select a much more memorable name for your camera such as "Bobscam.axiscam.net" and the service will translate the public IP address into the more meaningful name for you automatically.
Also, by registering, your camera will make continuous updates to the service automatically, so if your public IP address does change your camera will be kept up-to-date on the service. This means that by typing in your 'Axiscam.net' address you will have access to your camera permanently.
It's a neat solution and something which Axis provide free of charge to their camera users.
Great, How do I set this wonderful service up?
Enough blabbering, let's see how to set this up:
Step 1: Install your camera on the local network. Make sure it can be accessed locally through an Internet browser and it has a steady green light on the front.
Step 2: On the camera, press the reset button once. The green light should flash for a moment and then return with a steady light.
Step 3: Go to http://www.axiscam.net/ and enter the serial number of your camera (same as the MAC address) and then click the 'proceed' button.
Step 4: You will be directed to a page showing a temporary domain name for your camera. The temporary domain name will only work over the local network and will expire in 14 days unless made permanent. To enable external access you should make the address permanent.
Step 5: It will then show you a list of parameters as below:
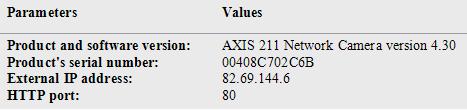
These cannot be changed as they come directly from your camera, so this is for confirmation only.
Step 6: Underneath those parameters you will find an option to enter your own unique subdomain for your camera. This is where you choose what to call your camera. Enter a name and click the 'save' button.

That's all there is to it. Your camera should now be set up.
As ever, if you have any questions relating to this guide please leave a comment and we would be happy to give you an answer as quickly as we can.